
Author: HairWeavings Editorial Team

Holiday Neck Stress? Try These 5 Simple Exercises

Holiday Neck Stress Try These 5 Simple Exercises

The holidays often bring a change in your routine that can cause stress and pain in your neck. Common to the mind/body world is the saying “it’s all connected.” This is never more true than with the relationship of your neck and shoulders to your posture. 

Most people have overly helpful
upper traps – yet other important muscles (like
your lats) remain underused. Let’s wake up those underused muscles! These
exercises may look simple, but if you sit, type, text, drive, or read a lot,
this work is important for you, and you’ll feel the results fairly quickly.

Exercise 1: Notice What Your Arms Are Doing

The pulley system that supports
your cervical and thoracic spine (neck and mid-back) can be assessed by taking
a look at your arms. 
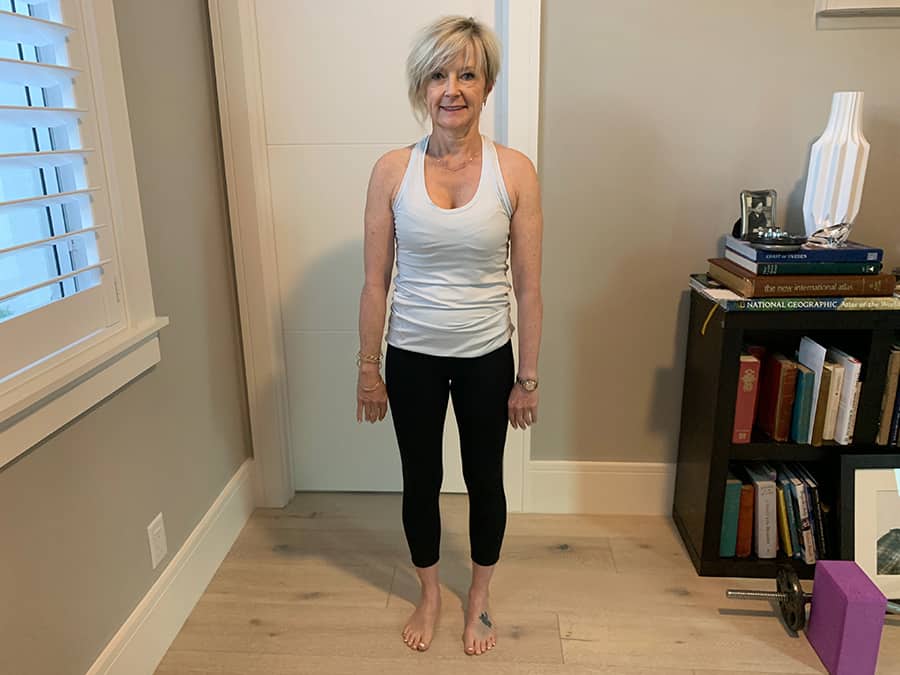
Stand in front of a mirror with your arms relaxed by your sides.
What most people see is that both arms hang hand down, landing a little bit in
front of their body. Often, the backs of their wrists are facing the mirror.

Ideally, in this natural, relaxed
state, you’d see your thumbs facing forward. However, what most of us see is
the backs of our hands. What you see is an important indicator of how things
are working at your neck and shoulders.

This posture means that your arm
bones are not in a place where your upper arms can even get toned without
creating neck tension.

Let’s fix that!

Exercise 2: Squeeze It in
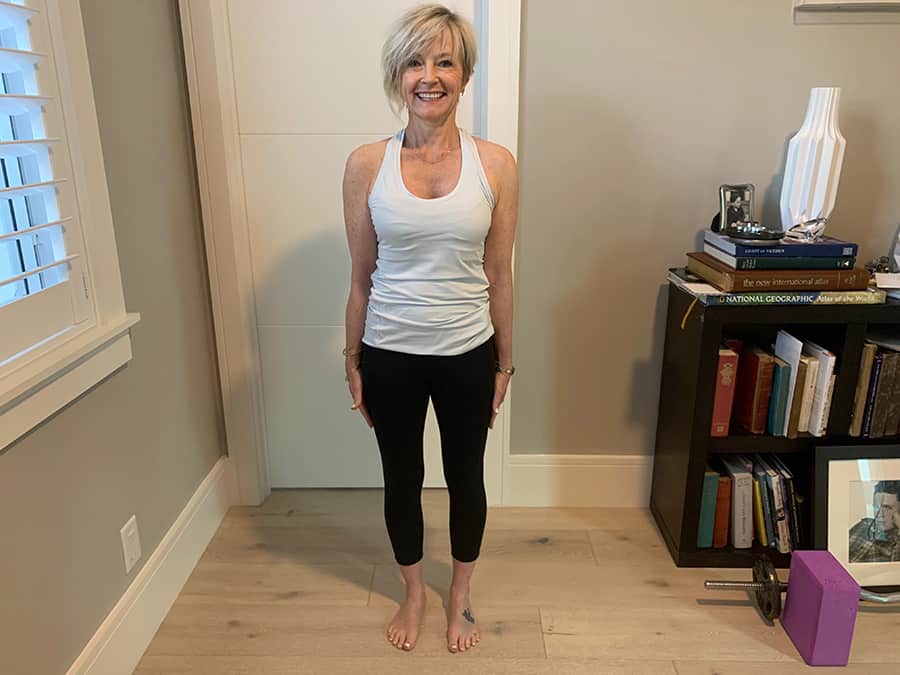
Standing in front of the mirror,
bring your hands alongside your body as if you were trying to touch racing
stripes on the side of athletic pant legs. Press the palms of your hands into
the sides of your thighs.

Once your hands are flat on the
side of your leg, try working all the muscles in your arms, shoulders and mid
back toget as much of your entire arm to touch your body as you can.

Now you are working all the little
muscles at the shoulder, as well as the big latissimus dorsi! Hold for about 10
seconds. Do this 5 times.

Exercise 3: Independence for Your Shoulders

Sometimes our arms and shoulders
move as one; other times they move independently of one another. This
independence is vitally important for the health and mobility of your neck,
upper back and shoulder area. 

The rhomboid push-up is a great
way to create more movement in your shoulder blades so that your mid back and
neck don’t get tense and knotted.
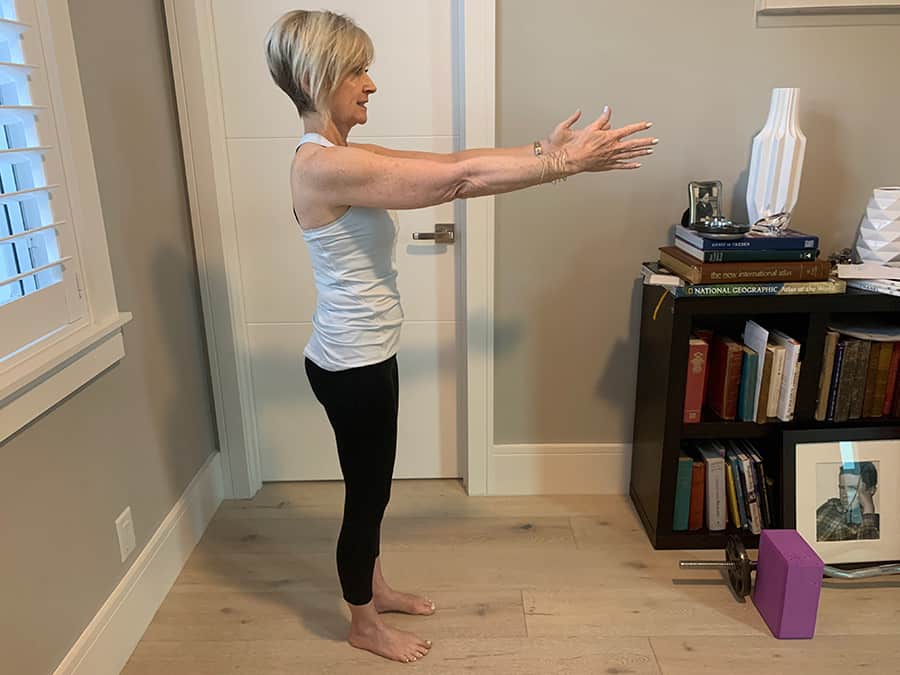
Stand with your feet solidly
planted beneath your hips and reach your arms out in front of you. Shoulder
height is great, but if you feel neck tension at shoulder height, drop your
arms a little lower.

Now pretend you’re reaching for a
yummy dessert about three inches in front of you. With straight arms and
outstretched fingers, invite your arms to reach for the dessert by allowing
your shoulder blades to get wide on your back and wrap to the front.

Now pull that dessert back towards
you without bending your elbows. The dessert gets closer to you as your
shoulder blades come closer together.

Invite the bottoms of your
shoulder blades to get closer to each other. If you concentrate on the tops of
your shoulder blades, your neck may decide to join the party – and we don’t want that. 

Exercise 4: The No-Grip Hold 
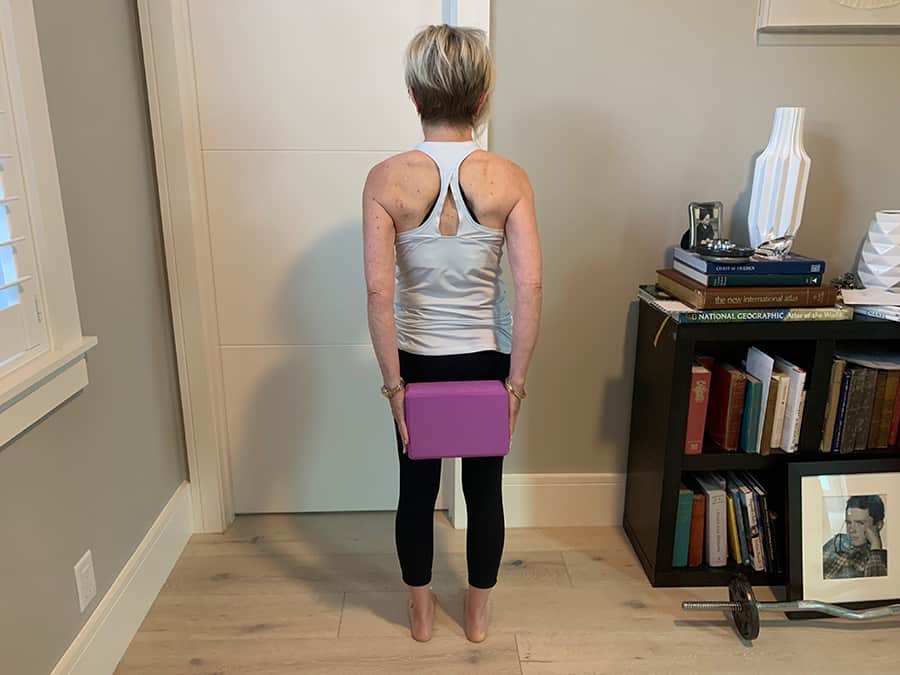
I know that this exercise looks pretty darn easy. But
it is VERY difficult. Many perform it with the elbows out
to the side, rather than with straight arms. Straighter arms are what we’d like
to see, to strengthen the correct muscles.

For this exercise, you’ll need a
yoga block or a book about 8–10
inches long. The longer the object is, the easier the no-grip hold will be.

All you need to do is hold the block behind you by pressing your palms into it. Hold with no gripping for 10 to 20 seconds, 3 times. 

If your elbows come out to the
side, it’s those darn lats that we need to work with again. The latissimus
dorsi is the largest muscle in our upper body, but our shoulders have gotten so
tight that our lats no longer generate much force.

As a bonus, think of how your
metabolism might rev up if it needs to power this big muscle more often. This
will help you muster the strength for one more hold!

Exercise 5: Simple Wrist Puzzle
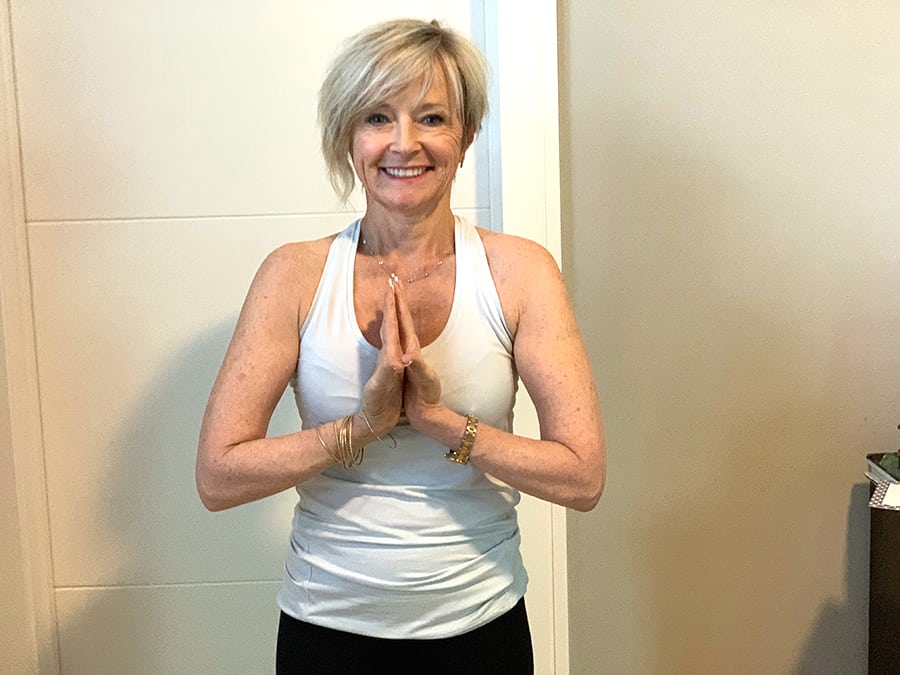
What is a wrist puzzle, you ask?
Getting the backs of your hands to touch in a reverse prayer shape in front of
your chest.

Although the goal is for the
entire backs of the hands to touch, including your thumbs, it takes time to
undo the tension and get to this point. Play around with how close to your body
and how far up or down you need your hands to be to make this work. 

Do not worry about how much or how
little is touching right now. The practice alone is the work. Remember, we are
looking for progress, not perfection.

Just Do It, But Don’t Overdo It!

There are no hard and fast rules
about how often to work with these exercises. If you find them challenging,
then you need them! And if you are someone who has an attitude of “a little is
good, a lot is better,” I urge you to please not overdo it. Change is slow.
After 60, change is slower. 

But it’s never too late. I have
clients in their 80s who have reduced their neck tension and improved their
posture as well. It takes patience, and sometimes six to nine months for real
change.

Then one day, you’ll be surprised
to have a friend or colleague notice that you walk with more energy, or you
look brighter and lighter as you get up from your chair.

They may not realize that your
head is no longer hanging forward and your neck isn’t in pain, but they will
know something is different and that it looks and feels awesome on you!

Further read, STIFF NECK AND SHOULDERS? MAKE THEM STRONG WITH THESE 5 EASY TO FOLLOW EXERCISES.

Let’s Have a Conversation:

How easy do these exercises look at first
glance?
Which
ones did you find most challenging? Would you like to see some stretches to set
you up for these exercises? Please share your thoughts below.

Read More

Madison LeCroy’s Blue Button Front Bikini Set

Madison LeCroy’s Blue Button Front Bikini Set / Southern Charm Season 9 Episode 13 Fashion

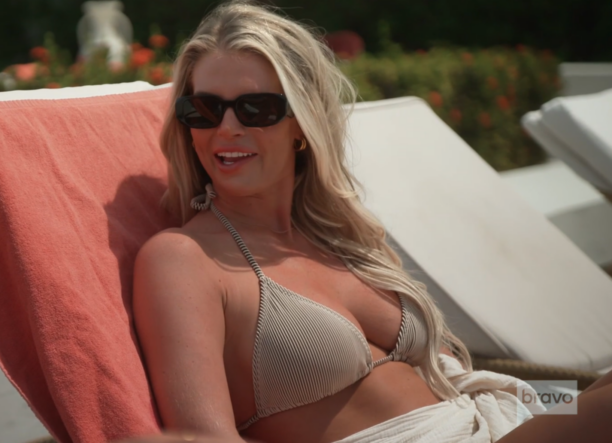
Even though here at BBH our Madison LeCroy content has been cut somewhat short (she BLOCKED us😳), it’s still nice we get to see her on our TV screens at least. Because we are a huge fan of the girl and love her style. Like this blue button front bikini set that she’s wearing on the boat in Jamaica, sooo cute. And considering it’s still in stock in a deeper blue along with Style Stealers means the only block that matters here is the sunblock that you will def want to pair with it.

Sincerely Stylish,

Jess


Madison LeCroy's Blue Button Front Bikini Set

Click Here for Additional Stock of Her Bikini in Blue or Pink


Style Stealers


Originally posted at: Madison LeCroy’s Blue Button Front Bikini Set

Read More

8 Fun Ways to Take Your Makeup Look to the Next Level for the Holidays Using Drugstore Makeup

makeup holiday look

Does it seem to you – like it seems to me – that the period between mid-October and the winter Holidays goes at supersonic warp speed? The Holidays are – indeed – fast approaching so today I thought we might have some fun looking at 8 different ways we can add a special touch to our makeup routine to make it Holiday worthy.

Now I don’t think any of us will use all of these techniques, but I hope you might enjoy adding one or more of these techniques to your normal routine to take your look up a notch and feel even more beautiful. As an over 60 makeup artist who specializes in helping those of us over 50 look like the best version of ourselves, I love sharing makeup tips, techniques and products that can make the biggest difference for us at this stage of our lives and give us a lovely holiday look.

First Step: Eyes

In the accompanying video, I completed my skin prep, filled in my brows, applied eye primer and used Elf’s Bite Size Eyeshadow Palette “I Love You a Latte” for my eyeshadow. But I want to add two techniques that will take this eye look up a notch before curling my lashes and applying mascara.

First, I’ll add a pop of shimmer along my upper lash line and in the center of my lid to add some brightness which will make my eyes look larger. I’m going to apply it with a pencil brush to be more precise with the application. I hope you won’t mind me cheating just a little bit by using a high end product –  a Laura Mercier metallic Rose Gold color – over the “Vanilla Ice Cream” color since that will create the color I want. I’m also going to apply both sticks along the inner bottom lash line and the inner eye area.

The other technique I’m going to use is for my eyeliner. Rather than a standard brown eyeliner, I’m going to go with a dark blue eyeshadow from the NYX Ultimate Vintage Jean Baby eyeshadow palette along the upper lash line and the outer edge of the bottom lash line. Then I’ll apply mascara.

Next Step: Face Makeup

The first technique for my face is applying my light highlighter on my cheekbones before applying my foundation. This technique can create a lovely lit from within glow. I’ll use my Wet and Wild Megaglow Liquid Highlight in “Halo/Goodbye.” Since I’ll be applying my foundation over the highlight, I’ll apply a little more highlighter than I would normally apply.

Be sure to check out Elise’s YouTube channel which specifically focuses on makeup tips, techniques, and product reviews for those of us 50+. Don’t forget to subscribe!

Next, I’ll go ahead and apply a combination of my Catrice True Skin Hydrating Foundation and L’Oreal’s Age Perfect Serum Foundation and then apply my Elf Hydrating Camo Concealer in Light Peach as my under eye corrector and Fair Beige concealer over it following by powder to keep it from creasing.

For contour under my cheekbones, along my jawline and on my forehead, I’ll use my Makeup Revolution Cream Bronzer in Medium. But the special technique I’ll use here is to use a sponge with a sharp edge to apply my Maybelline Banana powder under the area where I applied my contour. This will give even more definition to the face without looking harsh. I’ll let it set for just a bit and then brush it off with my Real Techniques Setting Brush.

I don’t regularly contour my face with a light color, but I will use this technique today to add even more definition to my face. I’ll apply Elf’s Fair Rose Concealer – which is lighter than my skin tone – in the center of my face and over my marionette lines. And I’ll use a brush to apply it so I can be more precise.

Blush and Lips Are Next

The next technique helps my makeup look more cohesive and harmonious. I’ll use my lipstick as my blush color. The lipstick is Flower Beauty’s “Dahlia Desire.” But to make it glide on more easily and to give my cheeks a little more glow, I’m going to mix it with just a tiny dot of Elf’s Halo Glow Filter Highlighter.

Now onto lips for the next technique. Before applying my L’Oreal Age Perfect lip liner in “Perfect Burgundy,” I want to add some fullness to my lips. So I’m going to apply a very tiny amount of my Revolution Cream Contour under my lower lip line and above my top lip line with a small brush. This creates a shadow effect which makes the lips look larger.

After my lip liner, I’ll use another technique to make my lips look larger. I’ll apply the NYX Jumbo Stick in “Vanilla Ice Cream” just at the top center of my lips and at the bottom center of my lower lip. The lip gloss I’ll use over my Flower Beauty lipstick is Sephora’s Glossed lipstick in the color “Wild.”  

Beautiful Finishing Last Touches

This last technique adds a beautiful finishing touch to my holiday makeup look. I’ll press a damp makeup sponge all over my face which will help all the products meld together and then I’ll use my finishing powder from Hourglass since I haven’t found a good drugstore dupe. Adding a finishing powder is another subtle way to make the whole look more cohesive and help us look more polished. In fact, if I could only recommend just one technique I’ve used today, it would be to use this amazing finishing powder. And luckily several of the Hourglass finishing powder colors come in a mini size which is not nearly as expensive as the regular size.

And if we really want to make sure that our holiday makeup will look as good at the end of the day – or night – as it did when we first applied it, be sure to spray a dampened makeup sponge with setting spray and press it into the face. I hope you’ll have fun experimenting with one or more of these techniques during the holidays.

Also read 7 SIMPLE HOLIDAY HAIRSTYLE TIPS FOR MATURE WOMEN.

Let’s Have a Conversation:

What makeup techniques do you use for holiday makeup? Do you like to have fun with makeup products and techniques? Are there any products you use to make your makeup last long?

Read More

Part 2 – Grandma School: Teaching What Schools Cannot

grandma school

What better time than the holidays, when hopefully we are seeing our grandchildren even more, to continue our focus on maximizing our playtime with the young ones. How about a fun time together AND nurturing better brain development? To that end, I continue sharing expert advice from Dr. Jill VandeHey Klefstad.

The first post in this series is available to read here: GRANDMA SCHOOL PART 1: THE IMPACT OF GRANDMA TIME

Dr. Jill’s Professional and Personal Expertise

Dr. Jill began teaching kindergarten in the 1980s but then took time off from teaching to raise four children. During that time, she earned a master’s degree which allowed her to teach courses at the University of Wisconsin-Stout and supervise student teachers in K-3 classrooms. Simultaneously, she completed a doctoral program that led her to be part of the early childhood education faculty at UW-Stout until retirement in 2021.

Grandmas Are Given Another Chance

Dr. Jill shared with me that while she loved being a mom to her four children, the demands of a full-time job affected her parenting. She ran out of time to do all the things she could have/should have done to enhance their whole development. How many of us can relate to that!?!

It wasn’t until she held her first grandchild that she realized she was being given another chance to do ‘all those things’ she had dreamed of doing with her own children. Now retired, she finds it to be a true gift to host Grandma School for her three granddarlings. “It is a privilege and a joy,” she glowed.

Grandmas Can Enhance School Efforts

The role of the grandparent varies for each one of us. But as Dr. Jill shares, it is a gift to be able to ‘teach’ our granddarlings about life. The focus of her Grandma School is not to make them smarter but to provide many of the things that children need to be kind, happy, and mentally healthy. Unfortunately, the curriculum in the schools is continually being ‘pushed’ down on our children with a focus more on test scores than development.

What We Learned in Kindergarten

Think back to what you learned in kindergarten. The focus was on social and emotional skills and on gross and fine motor things like how to tie your shoes and write your name. Sadly, the focus, even in some 4K classrooms, is on test scores.

What we are missing with such a focus is meeting the fundamental needs of little children. That is the “why” behind the idea sheet in each of these blogs, to provide developmentally appropriate ideas for children ages 2-5.

Meeting Their Fundamental Needs

Idea #1

What?

See Jill’s one-page idea sheet for a variety of December activities.

Why?

Christmas is about giving. What better gift to give your granddarlings than the gift of your time? Take a moment to look over the activities sheet and perhaps choose one activity that brings back a memory for you. Grandchildren love to hear stories about when you were little.

Idea #2

What?

Make reindeer snacks.

Why?

Having children make their snacks, which helps them practice and learn basic math concepts (spatial awareness, counting out the number of pretzel sticks, raspberries, etc.), also increases their vocabulary and knowledge. Did you know that both male and female reindeer have antlers and that reindeer do not fly but they are good swimmers? Check out more Reindeer Facts to share with them.

Idea #3

What?

Sort and group bells by size and color.

Why?

Children love to see and hear bells. It helps them to ‘hear’ the sound of Christmas. The bells can be sorted by colors, sizes, and sounds. Include some pipe cleaners and bells to string together to create various shakers and patterns.

Idea #4

What?

Decorate trees with loose parts.

Why?

Children are in awe of your Christmas tree. Allow them to decorate their tree with a variety of materials aka loose parts. You can create trees out of popsicle sticks, felt, contact paper, toilet paper rolls, or playdough.

Include ‘loose parts’ to decorate the tree including buttons, pom poms, pine needles, sequins, etc. Displaying your granddarlings’ Christmas trees will give them a sense of pride. In years to come, they will look for their tree at your house.

One Last Word About Loose Part Play

Loose parts can be defined as materials that are tangible and can be carried, moved around, taken apart, combined with other materials, and put back together in several ways. When children engage in loose parts play, which is open-ended, they are the director of the play.

This develops their creativity and deepens their critical thinking because there are no specifics given as to how to use the materials. Nature remains the richest source of loose parts but here is a list of other materials to consider having available for your grandchildren.

Watch for Part 3, the final blog of this series, with Dr. Jill as she continues to share the What and the Why for you to use with your own granddarlings.

Let’s Have a Conversation:

What holiday activities have you enjoyed with your grandchildren? What reactions have they had to your time together? What other feedback would you have for Dr. Jill? Let’s have a conversation!

Read More