Easy Halloween Crafts for Adults

I was born just after midnight on 31st October – so in our house Halloween has always been a time for celebration. I even got married in a grand Halloween wedding, where we made our own decorations and table settings – and even an orange wedding cake covered in spiders!
This year, why not treat yourself to a handmade Halloween? Whether you want to make elegantly eerie table decorations, spookily sophisticated crafts or gorgeously gothic garlands, here is a selection of easy and inexpensive ideas to create your own haunted mansion!
Author’s Note: All images are my own and can be found at Enter the Wildwoods.
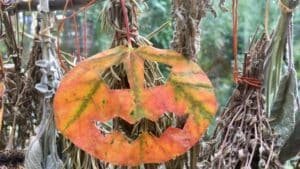
Leaf-Cut Pumpkins
If you live in a place where the treesblaze with autumn glory, you probably look for ways to preserve and enjoy those jewel-colours indoors. For many years, I have pressed and dried autumn leaves and sealed them with mod podge or varnish, and attached them to my windows so the autumn sunshine can pour through them and lift my heart. A few years ago, I had the idea that instead of cutting Halloween shapes from paper or cardstock, I could cut them from leaves!
Collect a bunch of leaves – you can rope in grandchildren to help with this lovely task and follow it up with a hot chocolate and marshmallows to make it an occasion. Choose a variety of leaf shapes, sizes and colours for the best display. If you live somewhere where leaves don’t change colour, you can always collect waxy green leaves to make your leaf cuts.
You Need
- Leaves
- Scissors (small sharp embroidery type)
- Mod podge or varnish
- Paintbrush
What to Do
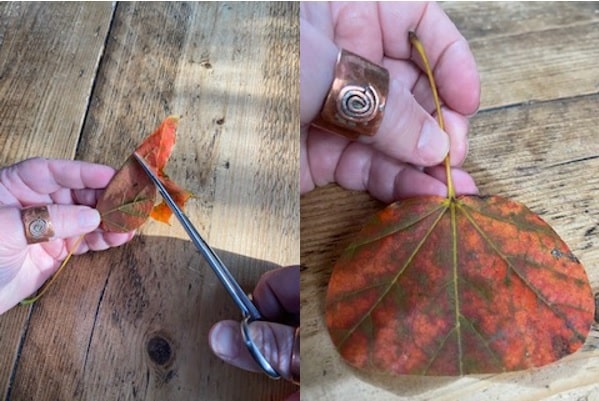
- To make a pumpkin, fold your leaves in half and cut half of the shape you want, so that when you open the leaf out you have a full pumpkin shape. To cut a pumpkin, hold the stem of the leaf (this will form the ‘pumpkin’ stem) and cut your desired curved shape. Then open the leaf shape.
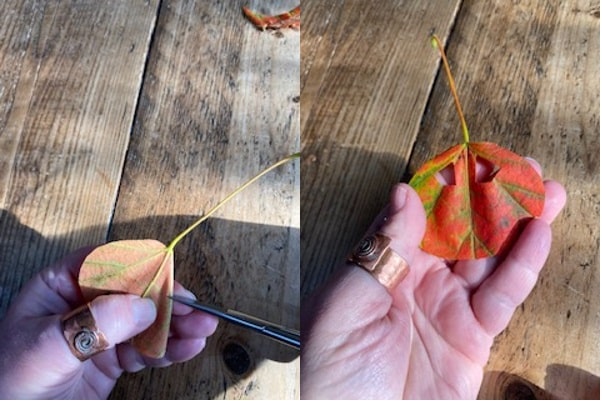
- Fold in the outer curve of the leaf on one side and cut an eye. Remember, you are cutting half of the shape you want to see when the pumpkin shape is opened. Repeat the other side so you have two eyes. Then open the pumpkin shape.
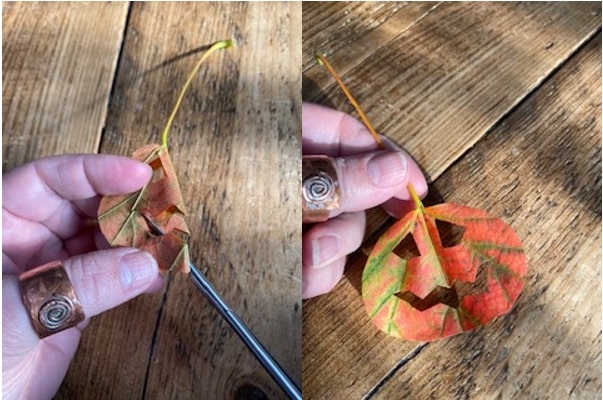
- Fold the leaf in half again and cut half of a jagged mouth to make a Jack O’Lantern – remember, when you open it you will see the whole mouth. Open the pumpkin, and you will see the grinning face!
- Press your leaves in a book or a flower press. When they are dry, after a week or so, varnish the leaves with mod podge or varnish to keep the colours and to make the delicate shapes stronger. You can hang them in the window, make leaf bunting, use them as table decorations, stick them on Halloween cards or frame them.
You can watch a video of this craft at the bottom of this page.
Pretty Pumpkin
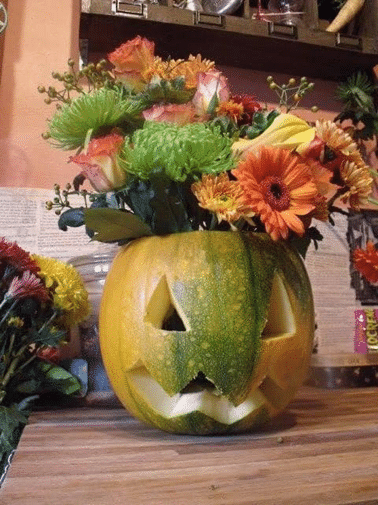
This simple to make pumpkin vase is eye-catching and will draw compliments from guests and Trick or Treaters alike!
You Need
- A pumpkin and tools for pumpkin carving (knives, scrapers, paper towels etc)
- A glass that fits inside your hollowed pumpkin – tall and heavy is good, like a pint glass
- A selection of seasonal flowers – oranges, greens and purples work well together, but choose anything that fits your holiday decor
What to Do
- Carve a pumpkin as usual, making sure you blot the inside of the pumpkin once empty to ensure it is not too damp or slippery. Discard the top of the pumpkin – you don’t need it.
- Fold a paper towel and put it in the bottom of the pumpkin to make a sturdy, non-slip surface.
- Insert your glass and fill it with water – not too full; you don’t want it to spill or overflow!
- Trim your flowers and greenery, and arrange them in the glass. Add decorations if you want to, such as a ghost on a floral pick.
Place your pretty pumpkin on the table next to a bowl of Halloween candies, or make several to be part of your Halloween dining or party table – and enjoy!
Read more about how to choose flowers and keep them fresh here: HOW DO I MAKE MY MARKET FLOWERS LAST?
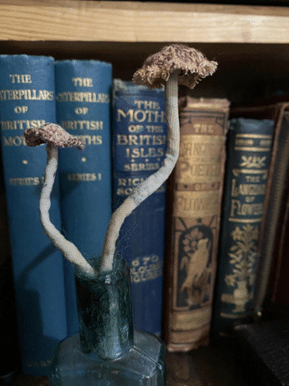
Toadstools in Bottles
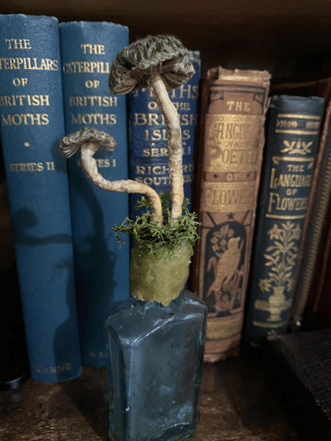
These gothic looking toadstools in vintage bottles are so beautiful, you’ll want to keep them on display all year – can we say a toadstool is for life, not just Halloween?
You Need
- A vintage bottle
- Pieces of scrap wire or a reel of garden wire and a wire cutter
- Scraps of fabric – I used cotton and linen
- Scissors
- Needle and embroidery thread
- Krazy glue/superglue
- A little moss or some wool fibre
- Wax – a scrap end of a candle is enough
What to Do
- Create your stem. You can either cut a long strip of fabric and wind it round your wire scrap, securing it with glue, or you can cut a piece of fabric and wrap it round the wire, and stitch down the ‘seam’ of the fabric to keep it in place – it all depends if you like sewing projects or not!
- Cut two discs for each toadstool cap. Contrasting fabric – whether that’s contrasting colours or textures is a personal choice – makes for an interesting toadstool. You can cut the circles freehand by folding a small square of fabric twice and cutting a curve across the open edge, or you can use a large coin as a template.
- I used a simple running stitch on one of the discs for each toadstool just to add interest and texture. This will be the top of the cap. Again, you might choose a contrasting or complementary colour of thread to do this.
- The second circle of fabric is for the under cap or gills. Again, depending on whether you like to sew or not, you can either draw radiating lines with a fine marker from the centre of the disc of fabric to create gills, or you can stitch the gill lines with embroidery thread. Both are effective; it’s a matter of choice.
- Attach the gills to the upper circle of the cap. You can use a little glue or a few stitches.
- Attach the cap to the stem. Use a small blob of glue and press the stem into the centre of the gills. Use your fingers to shape the cap and draw it down until the shape pleases you. You make as many as you like and can fit in the neck of your bottle.
- To glue your toadstool or toadstools into your bottle, wrap them in a little scrap of fabric and make sure they will fit in the bottle neck. You can wedge them in or add a little glue just inside the neck of the bottle.
- Melt some wax and daub it round the neck of the bottle for effect.
- Neaten the bottle neck by gluing a little wool fibre or moss to cover the fabric scraps.
- Now you have your very own toadstools (poisonous of course!) to loom from the gloom! These make a lovely addition to a Halloween table display.
Read More: HOW TO EMBROIDER FOR BEGINNERS: A COMPREHENSIVE GUIDE
Halloween Handbag
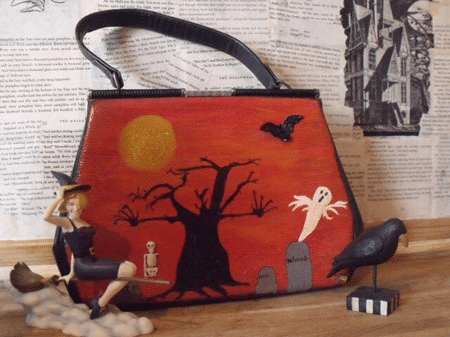
I’m always looking at gorgeous Halloween accessories – and then I put them back down again quickly because I see the steep price on the tag! I came up with my own idea for creating Halloween handbags from vintage or thrift store purchases. You can guarantee nobody else will turn up at the party with the same bag!
You Need
- A vintage handbag – it doesn’t matter if it is scuffed or has seen better days.
- Acrylic paint
- Paintbrushes
- Small, 2D Halloween decorations – the type you buy to put in Trick or Treat bags (optional) and glue
- Sealer or paint finisher
What to Do
- Ensure your handbag is dust or grease free before you start – that will help the paint to adhere better. Use clean spirit or alcohol wipes to gently clean the surface.
- Sketch out a plan on paper – keep your shapes simple so that what you imagine looks as good as your end result. You can do more complex designs once you get the hang of the process!
- Use your chosen acrylic colour to paint a ‘background’ – on mine I chose a bold burnt orange. Don’t be tempted to paint thick layers – build things up slowly, and the paint is less likely to crack over time and use. Let your design dry between layers to avoid paint colours ‘bleeding’ (although that sounds appropriate for the season…).
- Add elements of your design – spooky trees, ghosts, moons, stars… the choice is yours!
- When the paint is completely dry, you can glue on any decorations you have chosen as part of your design. Small plastic skeletons or bats can work well. Use a strong glue such as Krazy glue or superglue.
- Seal your design with paint finisher or varnish – again, two thin layers are better than one thick one to avoid cracking during use.
Carry your bag with pride! If nothing else, it’s a great place to store the good Trick or Treat candy…
Witchy Wands
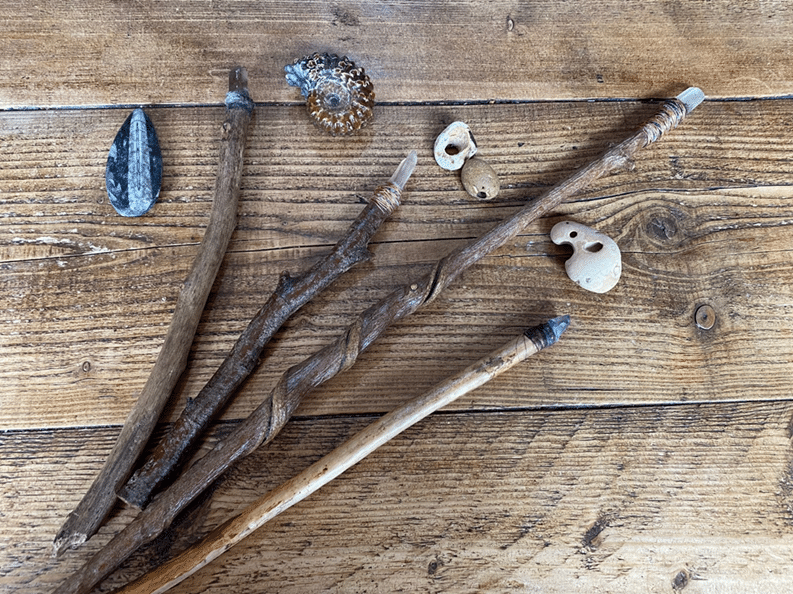
Now, for a quick costume, nothing beats slipping on a black dress and a witchy hat – we’ve all gone for that simple choice. But to give your outfit a touch of individuality, make yourself a wand that would make all the witches in Salem jealous!
You Need
- Foraged stick from the garden or a walk in the woods – the more textured the better. I look for wood that has been wound round by honeysuckle or is covered in lichen.
- A pretty stone or crystal as the ‘point.’ Old broken costume jewellery can be a good source.
- Krazy/superglue
- Mod podge or varnish
- Copper/silver coloured jewellery wire and wire cutters OR waxed cord
- Sandpaper if needed
What to Do
- Trim your stick or rub the ends to make sure it is smooth – you don’t want splinters! One end must be flat to attach the crystal point.
- Coat the stick in mod podge or varnish and prop it up in a jar to dry.
- Use a small blob of glue to attach the stone/crystal point.
- When the glue is dry and the crystal is securely attached, spread a little glue round the head of the wand and wrap with copper wire or waxed cord. The glue will help the wrapping to stay secure.
Now you are free to turn any cheeky visitors into toads!
Needle Felted Pumpkins
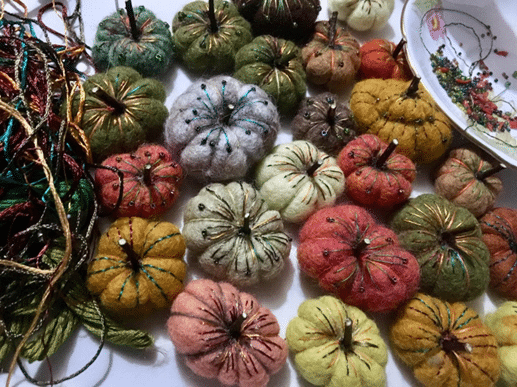
Make a set of needle felted pumpkins in gorgeous autumn colours, and you can hang them on a branch to make your very own stunning Halloween Tree! They also look lovely in heaps on your Halloween mantelpiece, or with a hand-written tag added they can make a lovely place setting. You can even make your own pumpkin patch with a vintage tin.
You Need
- A sponge or needle felting mat
- Felting needles
- Wool fibre in your chosen colours
- Embroidery thread
- Needles – a long, strong needle (a doll making needle works well if you have one) and a regular embroidery needle
- Beads and beading needle (optional)
- Tiny twigs for stalks’
- Krazy/super glue
What to Do
- Take a piece of fibre – the size depends on the size of the pumpkin you want to make – and roll it gently between your palms as though you were rolling a ball of dough. This helps to get the shape started.
- Place the wool on the mat and start to stab the wool to make a ball. Be careful to keep your fingers safely out of the way of the point – needle felting jabs hurt! Keep turning the fibre to make sure you form a ball – if you keep it in one position for too long, you will end up with a flat disc instead of a ball!
- Keep turning and stabbing until you have a firm ball. Make a selection of these in different colours.
- Now you are going to do a magic trick – turn your felt balls into pumpkins! Thread your longer, strong needle and tie a knot at the end of the thread. Push the needle up through the middle of the ball from the bottom to the top and pull the thread through firmly. Repeat as many times as you wish – this divides the pumpkin into segments.
- The sewing will have flattened the ball – or developing pumpkin – so you now have a dimpled centre where the threads all radiate out from. Before you glue a tiny stick into the dimple to make a stalk, you can add a few stitches or beading if you desire.
- To hang the pumpkins from a Halloween Tree, add a loop of thread to each pumpkin.
Pumpkin Patch

To make a tiny pumpkin patch display for your tiny pumpkins, all you need is a vintage tin or box, some tissue paper and foil scraps (I used black tissue with glitter accents to make a starry night sky), brown wool fibre or felted fabric for the ‘dirt’ and some PVA glue.
What to Do:
- Coat the bottom of the tin or box in PVA and press your brown fibre or fabric in the tin to make your ‘field.’
- Coat the lid of the tin or box in PVA and tear strips of paper to make a sky. Cut a disc from foil and glue it to the sky to make a ‘moon.’
- When these pieces are dry, arrange your pumpkins – if you don’t glue them in place, you can rearrange them to suit you.
Read more about needle felting: IS NEEDLE FELTING ON YOUR HOBBIES BUCKET LIST? LET’S GET STARTED!
If you have a go at making your own Halloween crafts, we’d love to hear about your experiences and see your photos, so please share them here in the comments and on our Facebook page.
Let’s Have a Conversation:
Have you ever made your own Halloween decorations, or a Halloween costume? What is your favourite Halloween memory – did you make Halloween crafts as a child?
Read More